What is Box2D? Box2D is a physics engine that has been used for many 2D applications to simulate physical behaviours. The most famous application that has used this open-source engine is Angry Birds. Box2D also has ports to many other languages such as Java, Python, Ruby, C#, Javascript, Flash, Processing, and many more. So what you learn here doesn’t have to be thrown away when you move to other language. Also note that Box2D is strictly a physics engine. It doesn’t display any graphics for you. It merely calculates all the positions and rotations of the bodies that you created for you. So if you want to display graphics, you have to use a graphics library like SFML which I’m using here (Note: I’m using SFML2). I’m also going to assume that you already now how to display things using whatever graphics library you’re using. You can download Box2D here.
Now I’m going to give you a quick start at to use Box2D. Firstly, Box2D has an object called b2World. b2World is the boss of everything; It’s where you create bodies and joints, and it also automatically manages all the memories it’s responsible for. To create a b2World in Box2D, you simply define the gravity (which uses b2Vec2, a 2D vector) and declare a b2World with the gravity as the parameter. Here’s how my code currently looks like:
#include <SFML/Graphics.hpp>
#include <Box2D/Box2D.h>

int main()
{
    /** Prepare the window */
    sf::RenderWindow Window(sf::VideoMode(800, 600, 32), "Test");
    Window.SetFramerateLimit(60);

    /** Prepare the world */
    b2Vec2 Gravity(0.f, 9.8f);
    b2World World(Gravity);

    ....
}
Before we continue, let’s also load up some image files (you can download them or make them yourself) to use for displaying the objects:
sf::Texture GroundTexture;
sf::Texture BoxTexture;
GroundTexture.LoadFromFile("ground.png");
BoxTexture.LoadFromFile("box.png");
Next, let’s make two function prototypes: one that will spawn a box whenever the user clicks left mouse button and another that will spawn a ground for the boxes to land on:
void CreateGround(b2World& World, float X, float Y);
void CreateBox(b2World& World, int MouseX, int MouseY); // Spawns a box at MouseX, MouseY
I’m going to use the functions here to explain how to create bodies in Box2D. Let’s work on the CreateGround() function. In order to create bodies in Box2D, we need to define what Box2D calls a Body Definition (b2BodyDef). BodyDef defines the initial position of the body and the type of the body (static, dynamic or kinematic). Static basically means that the body may never move. Dynamic means that the body can interact with other bodies. Kinematic means the body can move but it will not be affected by other bodies (for example, an elevator perhaps). So here, we’re going to declare a static body because we want the ground to stay still.
void CreateGround(b2World& World, float X, float Y)
{
    b2BodyDef BodyDef;
    BodyDef.position = b2Vec2(X/30.f, Y/30.f);
    BodyDef.type = b2_staticBody;
    b2Body* Body = World.CreateBody(&BodyDef);

    ...
}
You may have noticed something weird with the position. Why does it need to be divided by 30? We need to divide the pixel positions by 30 because Box2D doesn’t use pixel coordinates. Instead, it uses real world measurement units. So whenever we want to specify a position in the Box2D world, we need to convert to coordinates into the one that Box2D uses. I use 30 here because it’s what most people use (so it’s kind of a standard). Later when we’re going to display the graphics, we’re going to convert the body’s coordinate back into pixel coordinate again.
After we defined the body, we’ll want to define the shape and the properties of the body. We define the shape using b2Shape and the properties using what Box2D calls b2FixtureDef.
void CreateGround(b2World& World, float X, float Y)
{
    ...

    b2PolygonShape Shape;
    Shape.SetAsBox((800.f/2)/SCALE, (16.f/2)/SCALE); // Creates a box shape. Divide your desired width and height by 2.
    b2FixtureDef FixtureDef;
    FixtureDef.density = 0.f;  // Sets the density of the body
    FixtureDef.shape = &Shape; // Sets the shape
    Body->CreateFixture(&FixtureDef); // Apply the fixture definition
}
Great! Now let’s define the other function, CreateBox(). It’s quite similar CreateGround() with just a few changes:
void CreateBox(b2World& World, int MouseX, int MouseY)
{
    b2BodyDef BodyDef;
    BodyDef.position = b2Vec2(MouseX/SCALE, MouseY/SCALE);
    BodyDef.type = b2_dynamicBody;
    b2Body* Body = World.CreateBody(&BodyDef);

    b2PolygonShape Shape;
    Shape.SetAsBox((32.f/2)/SCALE, (32.f/2)/SCALE);
    b2FixtureDef FixtureDef;
    FixtureDef.density = 1.f;
    FixtureDef.friction = 0.7f;
    FixtureDef.shape = &Shape;
    Body->CreateFixture(&FixtureDef);
}
Let’s add the CreateGround function to our main() function so it looks like this now:
int main()
{
    sf::RenderWindow Window(sf::VideoMode(800, 600, 32), "Test");
    Window.SetFramerateLimit(60);

    b2Vec2 Gravity(0.f, 9.8f);
    b2World World(Gravity);
    CreateGround(World, 400.f, 500.f);

    ...
}
We also need to add a loop so that the simulation can run forever (until we close the window). This is also where we’ll use the CreateBox() function:
int main()
{
    ...

    while (Window.IsOpened())
    {
        /** When the user left-mouse-click, add a box into the world */
        if (sf::Mouse::IsButtonPressed(sf::Mouse::Left))
        {
            int MouseX = sf::Mouse::GetPosition(Window).x;
            int MouseY = sf::Mouse::GetPosition(Window).y;
            CreateBox(World, MouseX, MouseY);
        }

        /** Simulate the world */
        World.Step(1/60.f, 8, 3);

        ...
    }

    return 0;
}
After that part, we’ll take care of the drawing part. I also added a const variable above so we can easily convert between pixel and real-world coordinate. Notice that we also have to set the sprite pivot/origin to the center of your sprite so that it will rotate properly.:
int main()
{
    const float SCALE = 30.f;

    ...

    while (Window.IsOpened())
    {
        ...

        Window.Clear(sf::Color::White);
        for (b2Body* BodyIterator = World.GetBodyList(); BodyIterator != 0; BodyIterator = BodyIterator->GetNext())
        {
            if (BodyIterator->GetType() == b2_dynamicBody)
            {
                sf::Sprite Sprite;
                Sprite.SetTexture(BoxTexture);
                Sprite.SetOrigin(16.f, 16.f);
                Sprite.SetPosition(SCALE * BodyIterator->GetPosition().x, SCALE * BodyIterator->GetPosition().y);
                Sprite.SetRotation(BodyIterator->GetAngle() * 180/b2_pi);
                Window.Draw(Sprite);
            }
            else
            {
                sf::Sprite GroundSprite;
                GroundSprite.SetTexture(GroundTexture);
                GroundSprite.SetOrigin(400.f, 8.f);
                GroundSprite.SetPosition(BodyIterator->GetPosition().x * SCALE, BodyIterator->GetPosition().y * SCALE);
                GroundSprite.SetRotation(180/b2_pi * BodyIterator->GetAngle());
                Window.Draw(GroundSprite);
            }
        }
        Window.Display();
    }

    return 0;
}
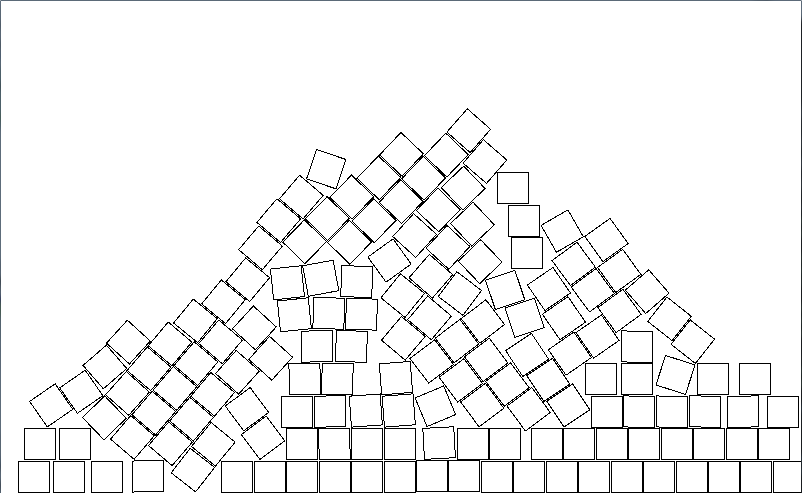
Now you should be able to run the program, play with it, and get something like this:

Source code:
Here’s some references that should prove useful if you wish to learn more about Box2D:

Thank you so much, I spent hours looking for a tutorial exactly like this! If you included SFML in the title I’m sure that could draw the attention of others looking for a similar article.
Thanks again,
Brandon
Thanks! Glad it helped you. I’ll add SFML then =P
As a correction, the first time you mention the CreateGround function you have the line:
— b2Body* CreateGround(b2World& World, float X, float Y)
where it should be:
— void CreateGround(b2World& World, float X, float Y)
Ah right. Thanks for correcting me.
Thanks for this! A friend and I just went through this together and learned a lot. Hopefully now we can move on to a project of our own. Thanks for assisting on the journey.
Mike
Glad could help! Good luck on your project! 😀
Thanks for taking the time and writing this tutorial. Works as expected.
Thanks for reading this tutorial! Glad it worked 😀
Hey! I used your tutorial to make a snippet to help people get setup with Box2D C# (Box2DX) and SFML .Net.
Thanks, glad you find it useful ^_^
I got my window blinking like hell (must be something with the framerate but i don’t know how to fix it. any helps?
And thanks for this sharing.
my bad, i had the “display” function inside the “for” loop!! 😀
anyway, thanks again for this amazing tutorial!! it really help me a lot.
No problem! I’m happy to see it’s still useful to people!
I am having trouble with your tutorial as my qt creator keeps complaining about the images not being found. Where did you put the images?
Heya! I believe I put the images on the directory where the binary is executed. I think Qt tends to generate the binary at different folder (build-*****-Debug or something like that) and the images aren’t there. That’s just my shot in the dark though. Let me know if it helps (or doesn’t)!