Previously, I have posted an article about a data structure for partitioning space called a Quadtree. It is a very basic implementation without any kind of optimizations, and it is also very static. It is static because the whole partitions of the quadtree is generated during setup time and it can’t grow depending on the number of objects thrown into the quadtree. I thought that it could be improved, so I decided to experiment by creating an adaptive version of the quadtree.
This version of the quadtree starts with only one node at the beginning that covers the whole area. As more objects are added to the quadtree, it will create four sub-nodes and move them to the sub-nodes if the objects fit into the sub-nodes. When the quadtree will grow depends on an arbitrary number of objects and therefore memory consumption will be varied depending on the size of the quadtree ( No need to create over 64 nodes if you only have 3 objects! ). Technically, it has no limit on how much it can grow.
I haven’t had the time to test its real-world performance but in theory, it should be more efficient than the previous implementation of the quadtree. It should be faster, more flexible, and the code should also look a lot simpler and more elegant. I adopted Go programming language idiom of making public methods starts with upper-case while the rest starts with lower-case.
As usual, I have the source code available for download for graphical version and bare-bones header and source files. However, I use SDL 2.0 for the graphical version this time.
When people have decent sized programming projects, what they have are usually a stable codebase and a development codebase. Stable means that it’s mostly bug-free, or at least they consider it to be so, while development means that they probably have new features added to the program or a quick-fix for a known bug which will then be polished until they think it’s stable enough for it to become stable. What they usually use for managing this kind of thing is source control management (SCM) systems.
Here, we’re going to talk about Git which is an SCM developed by Linus Torvalds and friends to manage the Linux kernel. Why Git? Because it is the best SCM tool out there ( or so Linus said in the following video. He apparently called Googlers ugly and stupid for using CVS or Subversion ).
What is Git?
Git is a free and open source distributed version control system designed to handle everything from small to very large projects with speed and efficiency. For example, let’s say you are working on a project and you only have the stable code. How would you create a development branch where you can experiment with stuff without affecting the stable branch? You just make another directory and copy-paste the stable directory to the development directory right? Well with Git, you can work on just a single directory. How? I’ll show you how.
How to use Git?
First, you need to download and install Git. All the Git commands introduced If you’re on the major Linux distributions like Ubuntu or Mint, you most likely can just enter this on the Terminal:
sudo apt-get install git-core
or for Red Hat distros like Fedora:
sudo yum install git
For non-Linux users, go to the Official website. On Windows, you would enter the Git commands on Git Bash.
I. Basics
First of all, I’m going to say that I’m going to keep this tutorial as short as possible because Git is a really big topic and I don’t like my tutorials to be too long by covering every nooks and crannies. So I hid some details because I want people to get started as fast as possible andI think people have the capability to figure what those commands does. There’s always git help [command] and the Official documentation to the rescue too if people have questions.
So after you’ve done all that stuff in the previous section, create a folder anywhere you want for your Git project. Here, I’ll just call my folder “test”:
mkdir test
Next, we need to initialize the Git repository on that folder:
cd test
git init
Now, let’s say we created a “main.c” file inside the folder.
touch main.c
To show what Git has to report to you about the files in the folder, type:
git status
And it’ll list “main.c” under “Untracked files”. Tracked files are basically the files that you wanted to commit because what you wanted to do with that file has been done. So we tell Git to track the file:
git add main.c
If you check the status again, you’ll see that “main.c” will be listed under “Changes to be commited”. Let’s make the first commit!
git commit -m "Initial commit"
You’ll see that Git tells you some information about the commit: – what branch it was on ( “master” )
– the first 7 characters of the SHA-1 checksum
– number of files changed
– number of lines added/removed
After that, you decided you want add 3 lines of code to your “main.c” and commit again ( remember, before commit, always add the files that you modified since last commit ):
Git tracks all your commit history. So if you want to check the commit history, enter:
git log
And really, that’s all you need to do to make Git keep snapshots of your files. Here’s a few additional tips and commands that may come in handy:
commands:
– git add -u – most of the time, you’d probably have many files, and it gets tiring to type “git add” on every single one of them. If you have added them before, and you want to add them again in a single command, this is what you use.
– git add -A – sometimes, you have new files…and a lot of them. You know you want to add all of those new files including the ones you added before. Use this command.
tips:
– .gitignore
Usually, not all of the files in your Git directory needs to be tracked ( e.g. .o, .a, .so, executables ). So you create a file named “.gitignore” in the directory and inside the file, it looks like this:
*.[oa] # object files and static libraries
*.so   # shared object files
main   # executables
II. Github
By now, you probably want to know how to “push” your Git repository onto a web server like Github. First thing to do is to go to Github, register an account and click on “New Repository” on your page. After you’ve created one, you can go to your Git directory on your computer from Terminal and add a remote server called “origin”:
cd test
git remote add origin https://github.com//test.git
Now, you want to actually “push” your Git local repository onto the remote repository at Github:
git push origin master
Now, if you check your “test” repository at Github, you’ll see that it lists “main.c” ( or whatever files you have ). Next, let’s say you’re now on different computer and you want to “clone” the repository onto this computer, easy:
git clone https://github.com//test.git
If the repository on Github is updated by some other collaborators, you can update your current local repository by typing:
git pull
III. Branching
So you worked on “main.c” for a while, you think it’s stable enough and you want to do some experiments/bug-fixes with it without affecting the “master” branch yet. Let’s create another branch then:
git branch testing
git checkout testing
What “git branch” does is just create another branch called “testing”. However, you’re still working on the “master” branch. So when you commit, you’re updating the “master” branch, leaving the “testing” branch behind. To switch to another branch, you use “git checkout”. A shortcut for those two commands is:
git checkout -b testing
After you worked on the “testing” branch for a while, you thought that “Well, this should make it to the master branch” and you want to merge them together. This is how you do it ( assuming you commited first ):
git checkout master
git merge testing
If you decided that you don’t need the “testing” branch anymore anytime soon, you can just delete it:
git branch -d testing
IV. And that’s it for the basics!
Now that you know all the basics stuff, you should check the Official documentation out on the official website. There are a lot more things that aren’t covered here =)
If you’re new to using command line to compile your programs, you probably haven’t realized how tedious it is to fully compile and link dozens, hundreds or thousands of files ( the Linux kernel has over 22,000 files ). Luckily, we have make to the rescue!
What is Make?
Make is a tool that makes compiling code a lot less tedious by executing user pre-defined compile instructions. Imagine for example, you have dozens of source files and every time you make changes to just one of the source file you have to type a long list of “gcc -o main main.o etc..”. Not to mention that sometimes you have your .h files in different directories for different source files. That would mean you will have to type several of this gcc -I -c file1.c file2.c etc... So everytime you want to compile your program, you’ll probably spend several minutes typing them out and maybe spend a few more minutes correcting some typos. So, how would you compile using make? Easy, just type make on the Terminal.
How to use Make?
Using make is incredibly easy. First, you need to create a Makefile ( just create a file and name it Makefile ). For the most part you just need to type, in specific format, what files you want to create, what files do they depend on, and how are they going to be created. Here’s a simple example of a Makefile:
all: main
main: main.o
	gcc -o main main.o
main.o: main.c
	gcc -c main.c
If you take the first version of main.c from the previous post and put it onto the same folder as this Makefile, you can compile it by just typing make on the Terminal and it will give you a completely compiled program with just one command. Awesome!
So what happened?
What message does the Makefile above tell make? If you look at the lines without the tabs, those are the dependency lines. The first untabbed line says that all depends on main, the second says that main depends on main.o, and so forth. So with that information, make knows that it needs to create main.o first because main needs main.o.
On the tabbed lines are the instructions. Instructions that you would normally type on the Terminal to compile and link source files and object files. And those are really the basic knowledge you need to get going with make.
Macros
Another convenient feature of make is that you can use macros. For example, you might have a Makefile like this:
If you want to change the compile options for gcc, you will have to change a lot of lines. For example, if it turns out you don’t want warnings, debug information, and optimizations, that means you have to remove the -Wall -g -O3 option line by line. If you have a lot of source files, it’s going to take a pretty darn long time. Well, that’s what macros are for right?
Defining a macro is simple. Just type the name in capitals, followed by =. On the right, you type what text you wish it to be replaced with. To actually use the text replacement, you just put a $ and the macro name surrounded by parentheses.
Now, if you want to change a compiler flag or change the include directory, you can just change the macro definition. A lot of time is saved!
That isn’t all
So that was great, now you can compile your program by just entering one word. But there’s more to make than just compiling your program. It can also help cleaning up all those .o files or do other command line stuff for you, like this:
Now, if you want to delete all the object files, you can just simply type make clean and whoosh they go! If you want to place the executable into another folder, just enter make install. The – tells make to ignore errors during the execution process of the command. The @ tells make to execute the command without printing the logs to the Terminal.
GCC is GNU Compiler Collection which, as its name suggests, is capable of compiling many programming languages not just C or C++. What that means is that you don’t need to type a specific compiler name just to compile a specific language. However, unlike what its name suggests, it doesn’t actually does the compiling itself. What it does is that it calls the other compiler which can compile your code to do the compiling work. So for example, if you’re trying to compile a Go program, you would type something like gc helloworld.go to compile it. With GCC, you can type gcc helloworld.go and it will call the Go compiler to do the work for it (assuming the gccgo is installed).
How to use GCC?
There are two major steps in compiling a source code to an executeable/library. The first step is to generate the object code of every single source code. Object code is basically machine code except that it’s not executable. The next step is the linking process. Usually an average program is broken into dozens if not hundreds of source code files to increase maintainability. After the object codes are created, there needs to be something to make sense of all those machine code. It is the linker’s job then, to piece all those codes together and make it executeable ( or into a library, more on that on later chapter ).
The compile process. Image by Mactech.
To get started, let’s start by writing a Hello World program. Let’s call it main.c:
/* main.c */

#include <stdio.h>

int main()
{
        char s[] = "Hello World";
        printf( "%s\n", s );

        return 0;
}
To compile it into an object code, open up the Terminal and enter gcc -c main.c where the parameters after the -c are the names of the source code files separated with spaces. After that, you should see that a main.o has been generated on the directory. The next step is to link it by entering gcc -o main main.o where the first parameter after the -o is the name of the executable you want to create and the following parameters are the object code files. Here we only have one object code file. After we have successfully linked the object file, you can then run the program by typing:
./main
Output:
Hello World
What about two source files?
Suppose you want to add, say, a len() function which tells you the length of a string to the source code, and you want it to be kept separated from the main source code file. You would create a new source file named len.c. In it, you add the following function definition:
/* len.c */

unsigned int len( const char *s )
{
        const char *c;
        for ( c = s; *c != ''; ++c );

        return c-s;
}
And then you probably want to add the function declaration to the main source file so the main program explicitly knows that the function exists. You also then want to print out the length of the string.
The project is called “The River” (see previous post), and it’s almost done. It’s a project that I and my classmates have been working on together for the past several weeks (along with other projects). My two other classmates have done all the laser cutting of the acrylics and also the wood blocks. I also pretty much finished the electronic wiring and the programming (might need some tweaks, as usual :p). It is now ready to be assembled. Here’s some pictures that I took with my lovely Android phone :
A circuit I did for the sculpture in its early stage. See how professional the wirings are!The wooden blocks. Complete with LEDs attached inside shooting up.My friend inserting wires to my circuit while I program the sculpture beside him. That's my laptop (:The sculpture with the first row (24 LEDS) lighted up. The acrylics are currently covered with some papers. Imagine if they're not covered!
Way before we setup the sculpture, I also did a quick simulation on how the sculpture will behave. The program can be downloaded here (with dummy sound sample because the original sound file is 221 Mb in size!). You can toggle how the threshold will behave using the ‘A’, ‘H’ and ‘M’ key. ‘A’ means the average value will become the threshold, ‘H’ means the highest value will become the threshold, and ‘M’ means you adjust the threshold manually using the slider. If you want to see the current values of the bars, you can press ‘V’. You can also save a screenshot using the ‘S’ key.
Over the past couple weeks, I and my classmates have been working on a new media performance project which involves actors, a huge object, audio playback and visual projections (some of which are live generated either using preset algorithm or using electronic sensors placed on the site). We already figured out the concept on how we’re going to implement the technologies quite some time ago; The past couple weeks were just the planning process. My role in the project is basically to tie things together such as how we’re going to project the visuals onto the big object, how all the sensors are going to communicate with the audio and visual workstations. I’m also involved with the conceptualization of some of the visuals though that’s not my principal focus in the team.
Here’s how our object is going to look like without projections:
and these are with projections (These are my visualizations which are animated and generated using Processing, a Java-based programming language):
Today, I also did some rough projection tests on scaled-down version of the object (without the tower). I also used Processing for this to adjust the vertices of image. It came out pretty good, but could be better.
Scaled-down version of the object (without the tower)
The mini projectors are put on the top and bottom-corner of the object in this image to be able to fully project the image onto the surface of the object. However, you can see that there are stretched parts of the image. This is because it’s a 2D quad image which you can only adjust the X and Y axis of the vertices. If the circumstances allowed, I’d have liked to create a 3D projection program using OpenGL and C++ to solve the distortion problems.
With projections
I also had a side-project which is a lamp that’s made of balsa wood, which I’ve already finished a week ago. It’s a pretty straightforward object, except the shape takes the form of a camera.
My cute little cameraMy camera when it's angry!A peek of the internal parts
The cost of building this object is quite cheap. The components are only composed of :
– wires
– sea-blue acrylic (for the squarish “lens”)
– the actual lens (the black and round thingy)
– 22 ohm/5W resistor
– 3W LED
– push-button
– 9V battery and its holder.
The circuit itself is very simple: (power > +led) and (-led > resistor > button > ground). Easy peasy!
Now that’s not all I’ve been doing for this couple of weeks. For the programming part, I’ve also been experimenting with modern OpenGL and GLSL. Tutorials on that? Hopefully 🙂
What is Box2D? Box2D is a physics engine that has been used for many 2D applications to simulate physical behaviours. The most famous application that has used this open-source engine is Angry Birds. Box2D also has ports to many other languages such as Java, Python, Ruby, C#, Javascript, Flash, Processing, and many more. So what you learn here doesn’t have to be thrown away when you move to other language. Also note that Box2D is strictly a physics engine. It doesn’t display any graphics for you. It merely calculates all the positions and rotations of the bodies that you created for you. So if you want to display graphics, you have to use a graphics library like SFML which I’m using here (Note: I’m using SFML2). I’m also going to assume that you already now how to display things using whatever graphics library you’re using. You can download Box2D here.
Now I’m going to give you a quick start at to use Box2D. Firstly, Box2D has an object called b2World. b2World is the boss of everything; It’s where you create bodies and joints, and it also automatically manages all the memories it’s responsible for. To create a b2World in Box2D, you simply define the gravity (which uses b2Vec2, a 2D vector) and declare a b2World with the gravity as the parameter. Here’s how my code currently looks like:
#include <SFML/Graphics.hpp>
#include <Box2D/Box2D.h>

int main()
{
    /** Prepare the window */
    sf::RenderWindow Window(sf::VideoMode(800, 600, 32), "Test");
    Window.SetFramerateLimit(60);

    /** Prepare the world */
    b2Vec2 Gravity(0.f, 9.8f);
    b2World World(Gravity);

    ....
}
Before we continue, let’s also load up some image files (you can download them or make them yourself) to use for displaying the objects:
Next, let’s make two function prototypes: one that will spawn a box whenever the user clicks left mouse button and another that will spawn a ground for the boxes to land on:
void CreateGround(b2World& World, float X, float Y);
void CreateBox(b2World& World, int MouseX, int MouseY); // Spawns a box at MouseX, MouseY
I’m going to use the functions here to explain how to create bodies in Box2D. Let’s work on the CreateGround() function. In order to create bodies in Box2D, we need to define what Box2D calls a Body Definition (b2BodyDef). BodyDef defines the initial position of the body and the type of the body (static, dynamic or kinematic). Static basically means that the body may never move. Dynamic means that the body can interact with other bodies. Kinematic means the body can move but it will not be affected by other bodies (for example, an elevator perhaps). So here, we’re going to declare a static body because we want the ground to stay still.
You may have noticed something weird with the position. Why does it need to be divided by 30? We need to divide the pixel positions by 30 because Box2D doesn’t use pixel coordinates. Instead, it uses real world measurement units. So whenever we want to specify a position in the Box2D world, we need to convert to coordinates into the one that Box2D uses. I use 30 here because it’s what most people use (so it’s kind of a standard). Later when we’re going to display the graphics, we’re going to convert the body’s coordinate back into pixel coordinate again.
After we defined the body, we’ll want to define the shape and the properties of the body. We define the shape using b2Shape and the properties using what Box2D calls b2FixtureDef.
void CreateGround(b2World& World, float X, float Y)
{
    ...

    b2PolygonShape Shape;
    Shape.SetAsBox((800.f/2)/SCALE, (16.f/2)/SCALE); // Creates a box shape. Divide your desired width and height by 2.
    b2FixtureDef FixtureDef;
    FixtureDef.density = 0.f;  // Sets the density of the body
    FixtureDef.shape = &Shape; // Sets the shape
    Body->CreateFixture(&FixtureDef); // Apply the fixture definition
}
Great! Now let’s define the other function, CreateBox(). It’s quite similar CreateGround() with just a few changes:
We also need to add a loop so that the simulation can run forever (until we close the window). This is also where we’ll use the CreateBox() function:
int main()
{
    ...

    while (Window.IsOpened())
    {
        /** When the user left-mouse-click, add a box into the world */
        if (sf::Mouse::IsButtonPressed(sf::Mouse::Left))
        {
            int MouseX = sf::Mouse::GetPosition(Window).x;
            int MouseY = sf::Mouse::GetPosition(Window).y;
            CreateBox(World, MouseX, MouseY);
        }

        /** Simulate the world */
        World.Step(1/60.f, 8, 3);

        ...
    }

    return 0;
}
After that part, we’ll take care of the drawing part. I also added a const variable above so we can easily convert between pixel and real-world coordinate. Notice that we also have to set the sprite pivot/origin to the center of your sprite so that it will rotate properly.:
It’s finally coming (no hard-set dates yet but soon). The video documentary about how indie games come to life. It’s no secret that big game companies like EA, Activision and Ubisoft has been hurting the game industry for the past several years. They keep releasing games, which are not really games but more like addictive drugs, to make lots of money. That is not game design, it’s business structure. But what they’re doing is perfectly fine and reasonable, it just means that there are more opportunity for people who don’t want to work with lots of people to thrive.
For quite some time, there have been a lot of indie game heroes coming up with great games like Super Meat Boy (Edmund McMillen and Tommy Refenes), Braid (Jonathan Blow), VVVVVV (Terry Cavanagh), and many others. Now, the most common misunderstanding is that those games they have made are thought by the public as their first games, or even ones of their first ten games. The truth is they all have worked on many previous games before that and most people just don’t know that. They have worked their way to this level. The reason they’re making lots of money now is not because they wanted to make lots of money, but they wanted to make games that are fun and will be played by lots of people.
Anybody can make lots of money if they just copy FarmVille or Angry Birds. No, they make games because they love doing it. As Phil Fish said, Game is “sum total of every expressive medium of all-time, made interactive. How is that…it’s awesome!” and I absolutely agree with him.
Yesterday, I was working on another version of my game engine. I added several key features needed in a proper game engine such as the screen manager, input manager, resource manager, the world manager, so on and so forth. At some point, I needed to implement collision detection. Way before I even thought of creating a game engine, my implementation of collision detection is very simple: For each object in the game, check whether it touches every single other object in the game. That is fine if you are working with like 10 objects. But as the number of objects go higher, the number of checks that need to be done increases exponentially.
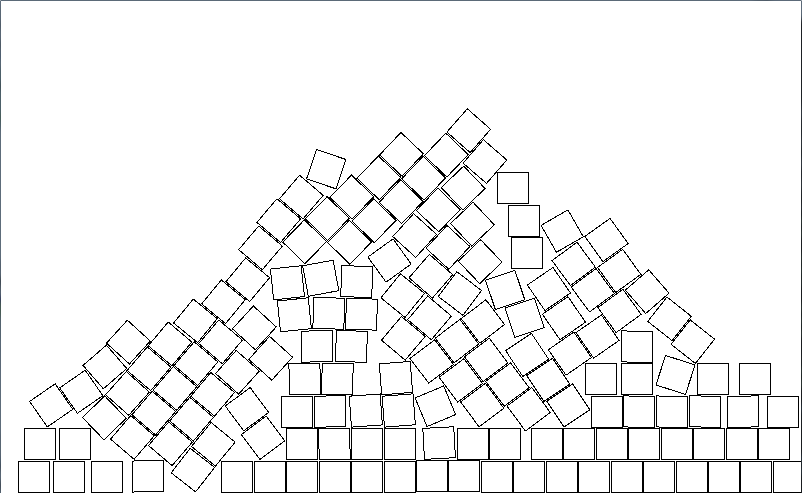
Imagine a game where you need to shoot a lot of bullets against a lot of enemies!
For example, if you have 10 objects, you have to check 10 (objects) against 9 (other objects) which equals to 90 checks. And for 100 objects, that means you have to check 100 (objects) against 99 (other objects) = 9900 checks. That’s really a lot of checks. The problem is that this method checks one object with another object even though they’re 10 miles apart! (Unless they’re really that big which I doubt they are)
How Quadtree looks like
The solution is by using what programmers call a Quadtree (the article here explains it very well). This method put objects which are near each other in a single cell while the objects that are far away are put in other cells. That means you only have to check objects that are in the same cells which will totally decreases the number of checks to be done. I’m going to use the word “Node” instead of “Cell” after this.
What follows are the implementation of the Quadtree class. I’m not a graduate of Computer Science( Art, in fact ) so there bound to be some mistakes or improvements to be done.
Edit: I updated the Quadtree a little and hopefully made it easier to read and understand. I also decided not to post the code on WordPress because some of the code doesn’t appear correctly.
I’ve been quite busy in these past few weeks so my apologies for no updates on OpenGL tutorials. I’m busy not only with school projects but also personal projects and hobbies. I’m sharing just SOME of what I’ve been working on lately:
First, ONE of my school projects:
This is one of my school projects which I’m doing with my classmates. It’s a light sculpture that represents a river. It has different heights/intensities which is based on the shape of a river. We’re going to place LED lights just beneath the acrylic which will then be animated using Arduino according to a pre-recorded sound file which was recorded during our journey through the path of the river. I and one of my friends will be doing the electronics part. I’ll also help another of my friends with the programming. I made the render above by modeling the object in 3DSMax, which you can get for free if you’re a student, and then process the lighting in Unreal Development Kit. I chose Unreal Development Kit because it’s just so user-friendly to a 3D model noobs like me 8)
Then I’m also doing some drawings and paintings because I just felt like doing something new 🙂
Lastly, I’ve also been working with my custom game engine which I plan to use for quite some time. Hopefully all these things will be done quite soon! (Which then translates to faster and more frequent tutorial/game blog posts! :D)